Galveston Island

What and Why
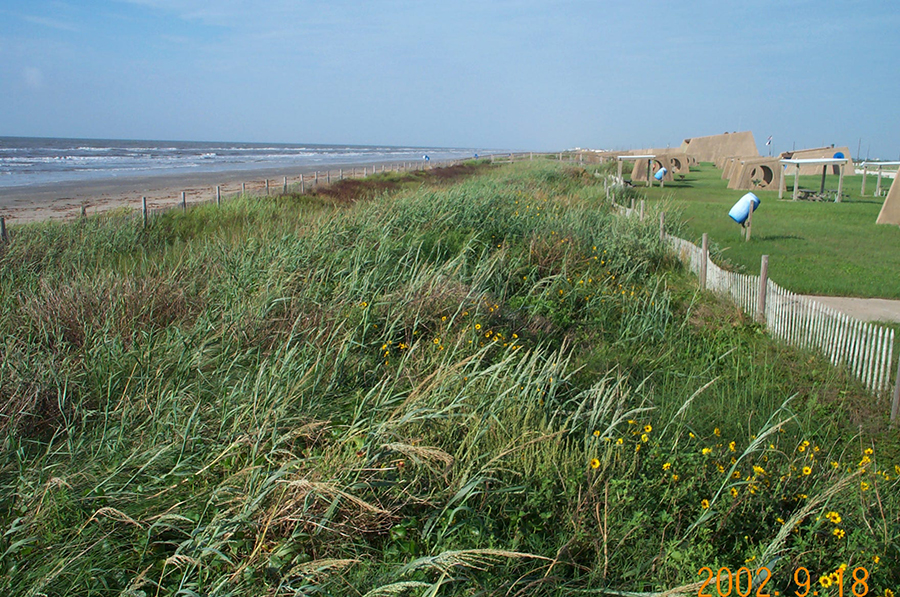
Beach.
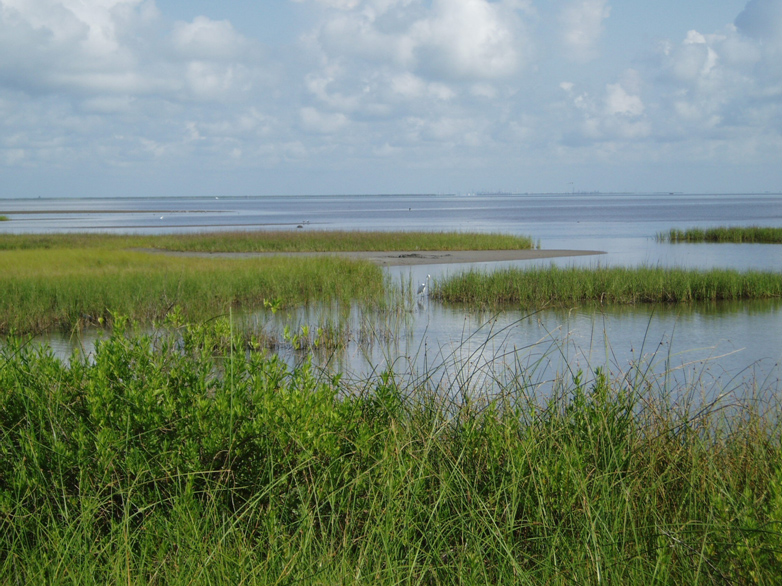
Marsh. Photo by Bill White, UT BEG.

Hurricane damage. Photographer unknown.
What?
Galveston Island is a sandy barrier island located 50 miles southeast of Houston. The island, 30 miles long and up to 3 miles wide, separates the Gulf of Mexico from West Bay, which is part of the Galveston Bay system. It lies at the eastern end of a nearly continuous chain of barrier islands that extends more than 600 miles along the Texas and Mexican coasts.
Why?
The formation of Galveston Island has created a variety of natural environments important to Texans today, both on the island and in the sheltered, lower-energy area called Galveston Bay that sits behind the island. In Galveston Bay, marshes, tidal flats, and seagrass beds serve as a nursery for many aquatic species, including shrimp.
An Historical Location
Because of its strategic location, Galveston Island—inhabited since the 1500s—has played a key role in Texas history. The island was home to many famous people of history, including Spanish explorer Cabeza de Vaca and pirate Jean Lafitte. The greatest natural disaster in U.S. history occurred on Galveston Island in 1900 when a large hurricane devastated the island and killed more than 6,000 people. For more on the history of Galveston Island, click here.
All photos (excluding aerial photos) by Jim Gibeaut, UT BEG, unless otherwise noted.
Where
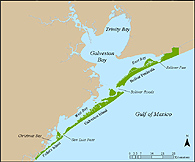
Location map
Where?
You can get there by driving across either the I-45 bridge that connects the mainland with the island or the bridge spanning San Luis Pass on the west end of the island or by taking the ferry from Bolivar Peninsula. The ferry is free and is operated by the Texas Department of Transportation 24 hours a day, 7 days a week.
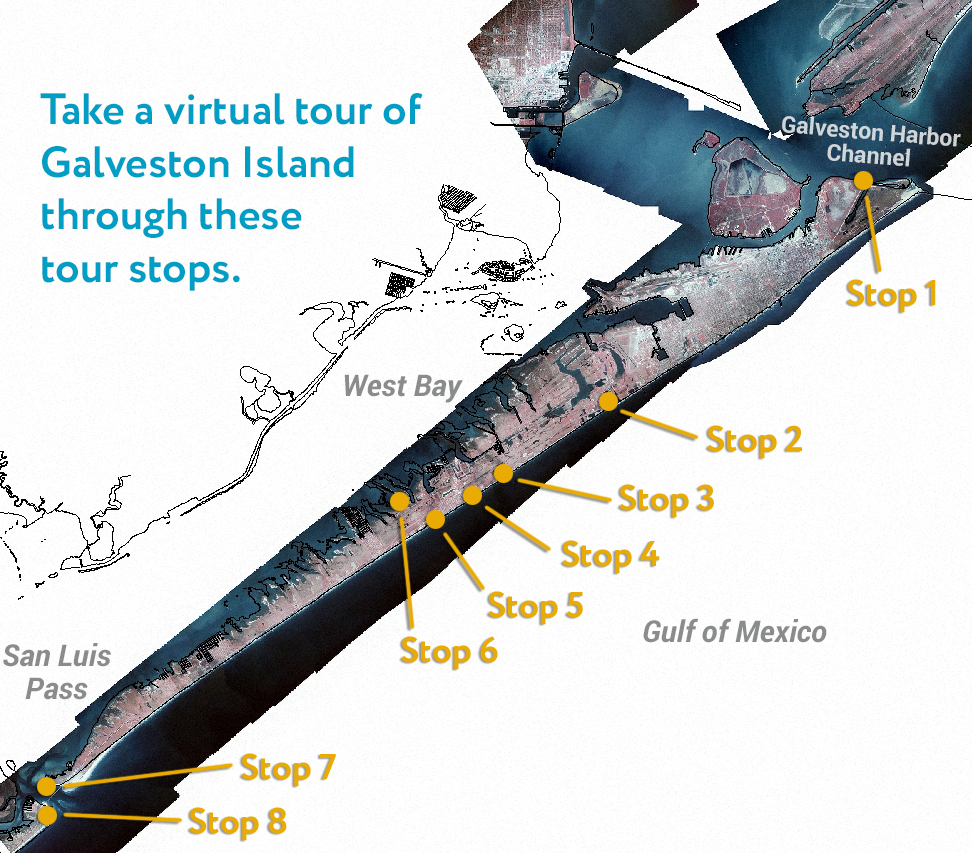
Stop 1. Northeastern end of Galveston Seawall
Stop 1. Northeastern end of Galveston Seawall
Points of interest: Bolivar Roads Ship Channel, Galveston Jetties, Big Reef Nature Park, Fort San Jacinto, Bolivar Lighthouse, and Galveston—Port Bolivar Ferry Operation.
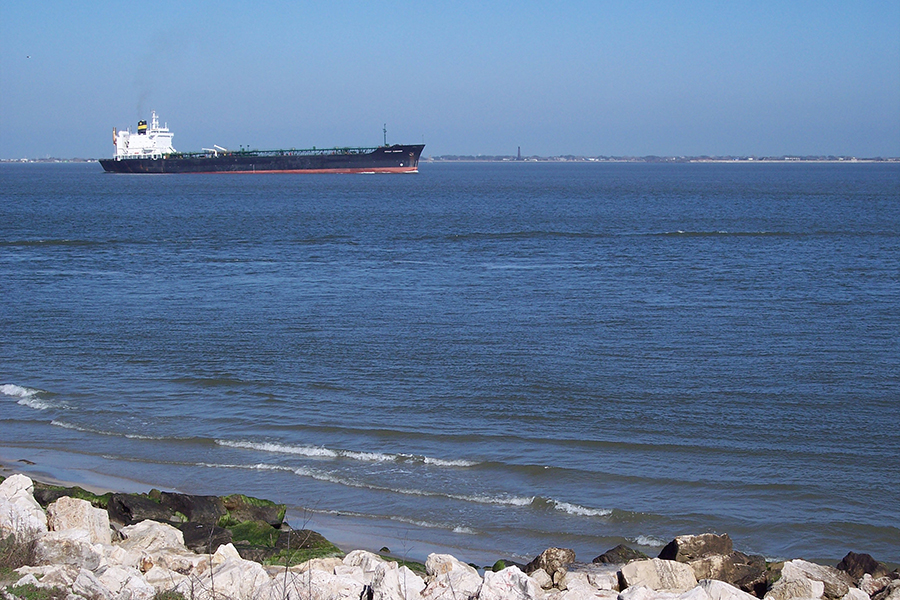
Outbound ship moving through the Galveston Harbor Channel. Photo is taken from the northeast end of the Galveston Island Seawall. Bolivar Peninsula is in the background, and the black Point Bolivar Lighthouse, first lit in 1872, is visible just in front of the ship. This 40-feet-deep, dredged channel provides deep-draft access to the ports of Houston, Galveston, and Texas City. The port of Houston is first in the United States in foreign waterborne commerce, second in total tonnage, and sixth in the world.

Northeast end of the Galveston Island Seawall looking toward the southwest. In contrast to the southwest end of the Seawall, land has accreted seaward (to the left) of the Seawall since the early 20th century.
Stop 2. Southwestern end of Galveston Seawall
Stop 2. Southwestern end of Galveston Seawall
Points of interest: Erosion of beach adjacent to seawall and erosion control device—Geotextile tube project.
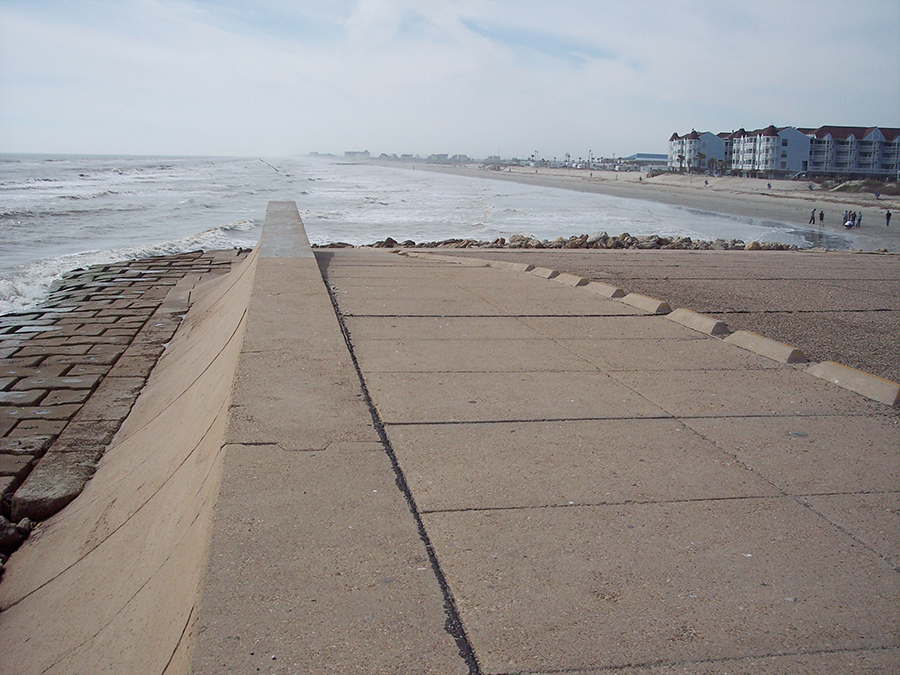
Southwest end of the Galveston Island Seawall looking toward the southwest. In the early 1970's cars could drive off this ramp onto the beach. Also note the lack of a beach seaward of the wall.
Stop 3. Bermuda Beach Subdivision
Stop 3. Bermuda Beach Subdivision
Point of interest: Homes on the public beach easement.
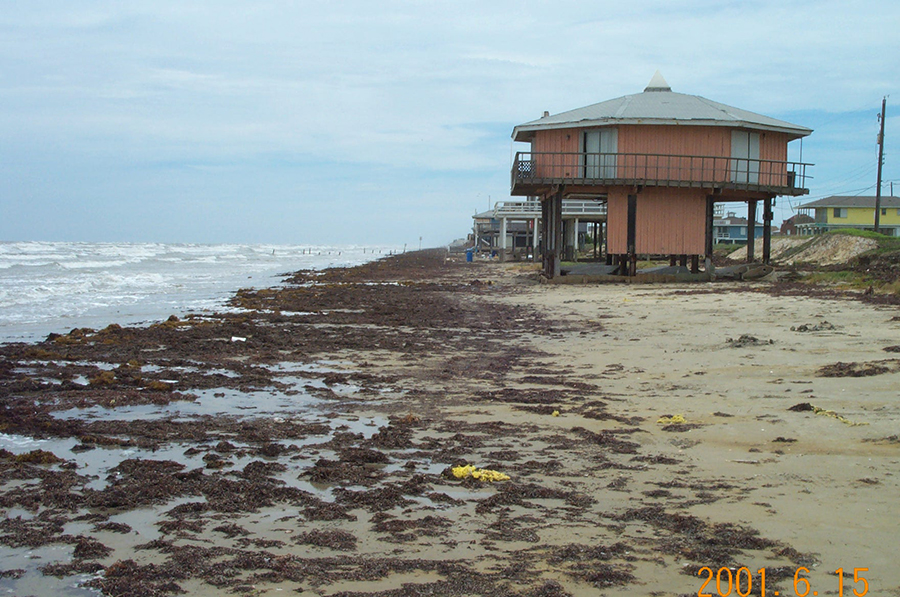
Houses on the public beach easement in the Bermuda Beach Subdivision on Galveston Island. Photo taken June 15, 2001.
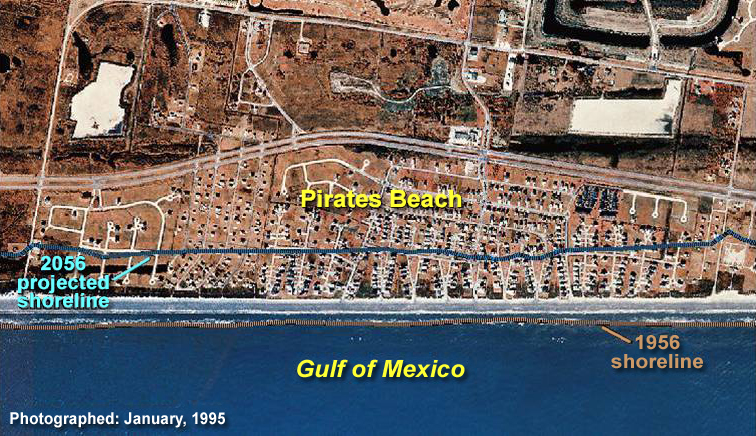
Stop 4. Pirates Beach Subdivision
Stop 4. Pirates Beach Subdivision
Points of interest: Attempt at using geotextile tubes to protect houses from shoreline retreat and storm surge. Contrast this beach with the beaches at the State Park (stop 5) and Bermuda Beach (stop 3).

Exposed geotextile tube protecting houses in the Pirates Beach Subdivision along West Beach of Galveston Island. This project is 1.56 miles in length and was installed in 1999. Photo taken January 26, 2005.
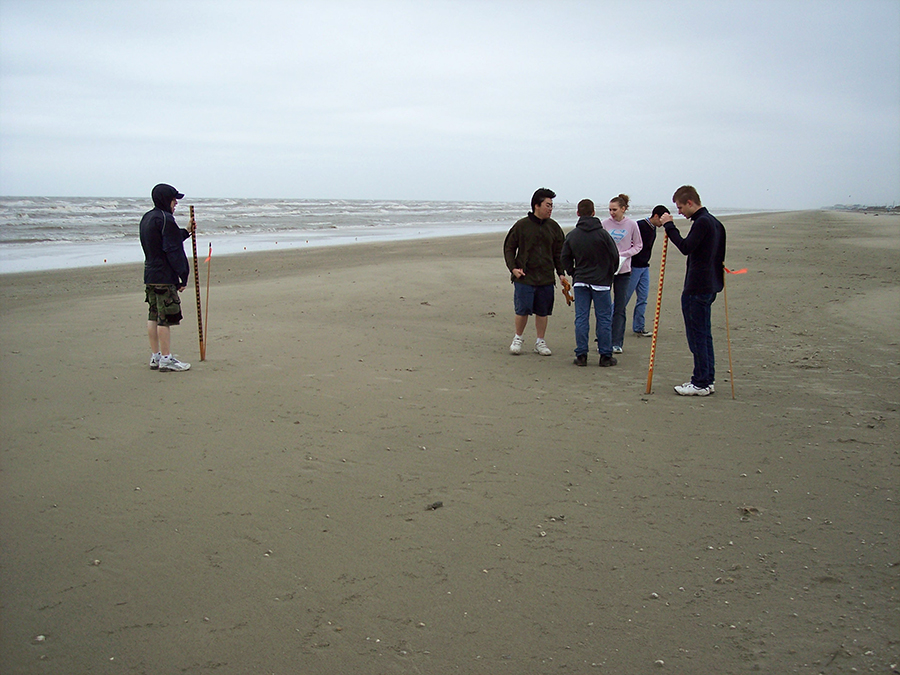
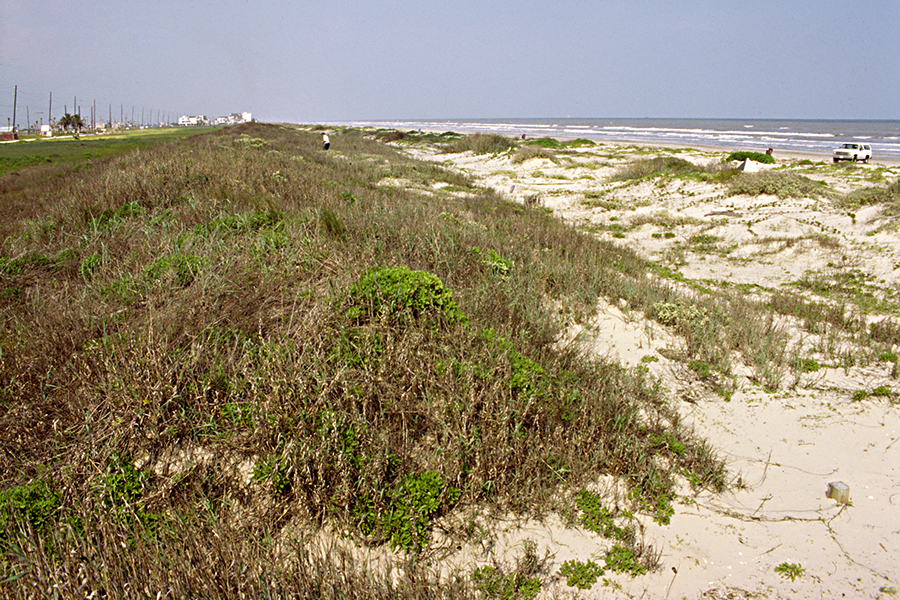
Stop 5. Gulf Beach in Galveston Island State Park
Stop 5. Gulf Beach in Galveston Island State Park
Points of interest: Relatively natural beach with dune enhancement using sand fencing.
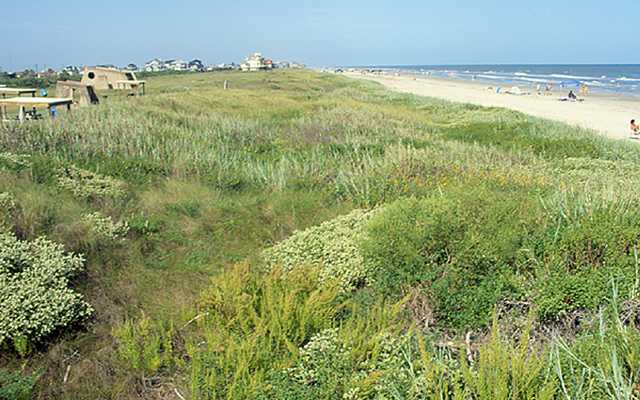
Beach profile location BEG-02 before Tropical Storm Frances.
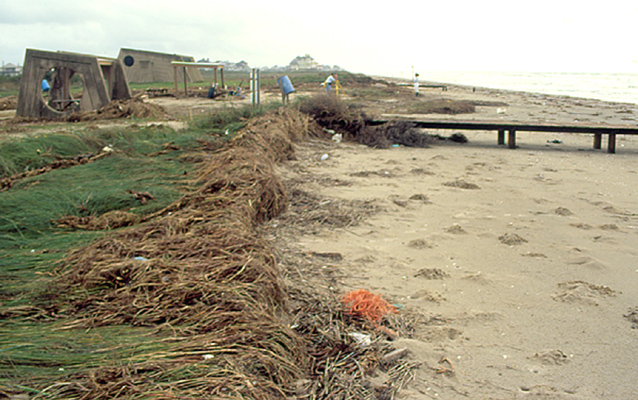
Beach profile location BEG-02 after Tropical Storm Frances.
Stop 6. Wetlands in Galveston Island State Park
Stop 6. Wetlands in Galveston Island State Park
Points of interest: Natural wetlands and illustration of wetland restoration project erosion control device—geotextile tubes.
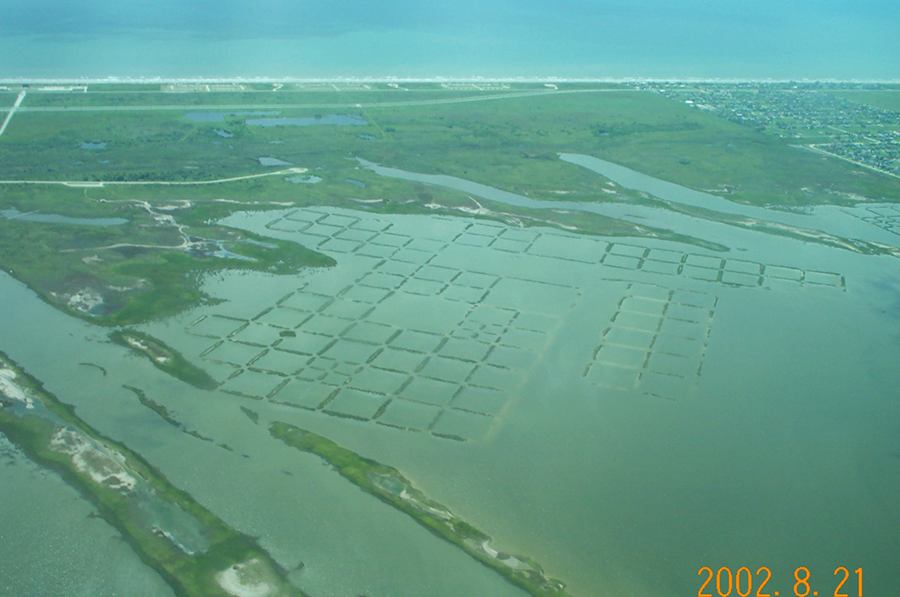
Galveston Island State Park terrace-style marsh restoration project completed in 2000. These terraces were created by dredging bay sediments and forming berms with intertidal elevations. The berms were then planted with marsh plants by hand. Photo taken August 21, 2002.
Stop 7. San Luis Pass
Stop 7. San Luis Pass
Points of interest: Sediment dynamics at a natural tidal inlet and erosion control strategies.
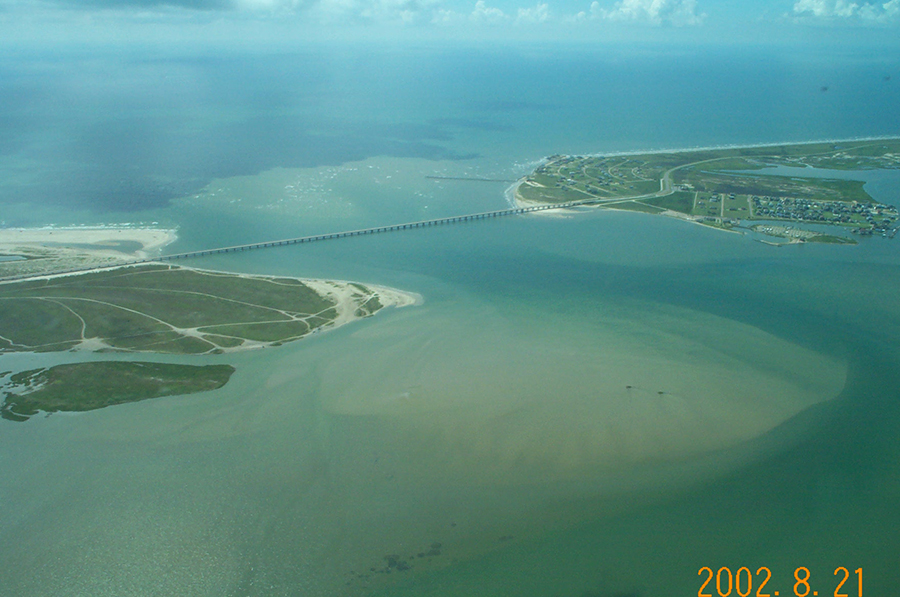
San Luis Pass looking seaward with Follets Island on the right and Galveston Island on the left. The Treasure Island Subdivision is on Follets Island.
Stop 8. Treasure Island Subdivision on Follets Island
Stop 8. Treasure Island Subdivision on Follets Island
Points of interest: Sediment dynamics at a natural tidal inlet and erosion control strategies.

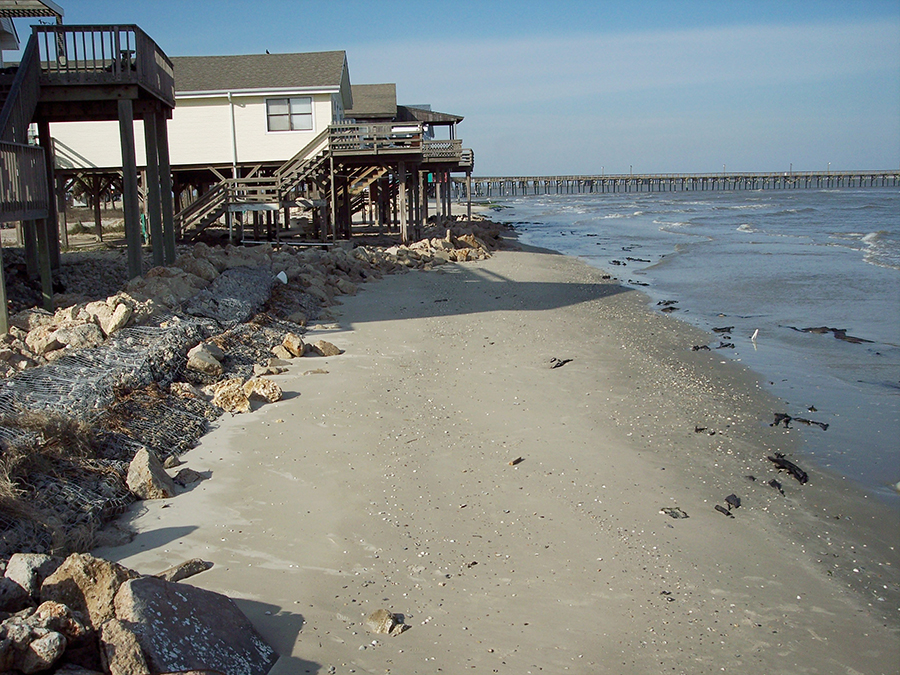
Destruction of geotextile tubes protecting houses on Follets Island adjacent to San Luis Pass (Treasure Island Subdivision). Photo is looking to the northeast toward San Luis Pass. The tube was installed March 2000.
- June 2001, the tube and scour apron are exposed in the foreground but remain covered in the distance.

Destruction of geotextile tubes protecting houses on Follets Island adjacent to San Luis Pass (Treasure Island Subdivision). Photo is looking to the northeast toward San Luis Pass. The tube was installed March 2000.
- September 2002, the walkover is damaged, and the tube is exposed along its entire length. Erosion has also occurred behind the tube.
Destruction of geotextile tubes protecting houses on Follets Island adjacent to San Luis Pass (Treasure Island Subdivision). Photo is looking to the northeast toward San Luis Pass. The tube was installed March 2000.
- January 2005, the tube has been completely destroyed, along with the walkover. Small riprap has been placed in front of the houses.
FAQ
Looking west. Note the smooth Gulf shoreline as compared with the ragged bay shoreline.
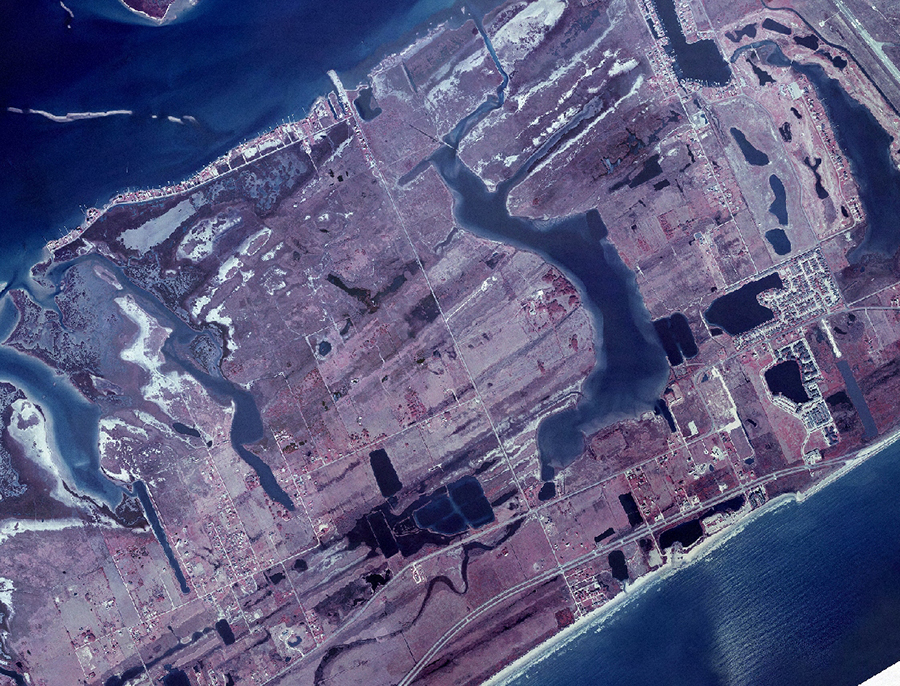
Aerial photograph showing how Galveston Island was constructed by the addition of sand ridges.
Today the Gulf shoreline is retreating along the part of the island west of the seawall.
Frequently Asked Questions
Q. How old is the island?
A. Geologists have drilled holes in the island and dated sea shells to determine that Galveston Island began to form about 5,300 years ago, when the rise in sea level from the melting of ice from the last Ice Age began to slow down.
Q. How did the island form?
A. Waves and currents swept sand into ridges that eventually merged and became Galveston Island. Today you can see these early ridges and swales between the ridges on the back side of the island. Large storms cut channels across the early island and deposited sand on the island's bay side. Sand was added to the Gulf side of the island, creating a series of ridges and swales as the supply of sand changed through time.
Q. Is the island changing?
A. Galveston Island is constantly changing—sometimes suddenly and dramatically as during a hurricane. There are many other sources of change on the island:
- Property development affects the island, most noticeably in the new subdivisions along the west side of the island.
- Natural forces are causing the island to erode. On West Beach (west of the 10-mile-long Galveston Seawall) waves, storms, and rising sea level are causing significant beach erosion. Beaches and marshes on the bay-side of the island are also eroding. This erosion is caused by sea-level rise, currents, waves, and a general lack of mud and sand to counter the effects of erosive forces.
- Natural forces are adding land to the island. Sand is piling up against the channel jetty along East Beach, causing the shoreline to grow.
Activities
Activities
Introduction to ocean waves: transfer of energy from wind to waves
Objective
The objective of this activity is to introduce basic terminology used in reference to periodic waves and to provide an understanding of how wind energy is transferred into wave energy. This activity also introduces the effects of water depth on waves.
Time Frame: 50 minutes
Click here to download this Activity in PDF format for printing.
Materials
- Hand-held hair dryer, block of wood and string, or thin wooden board to act as a paddle
- 9 × 13-inch, clear glass Pyrex pan; large cookie sheet at least ¼ inch deep, an aquarium, or any other clear container. Students should be able to observe wave properties. (HINT: A clear, under-the-bed plastic storage box works really well. Although it is shallow, your wave field will be much longer than in the other containers.)
- Pitcher of water
- Construction paper
- Ruler
- Stopwatch
- Modeling clay (or anything that can be placed in the water as an obstruction)
- Cork (or anything similar that will float)
- Towels for cleaning up
- A water-soluble overhead-projector marker (optional)
CAUTION: Please note that electricity is involved in this activity and proper adult supervision should be present. Participants can become actively involved once the electrical portion of the experiment is completed.
Create a wave tank.
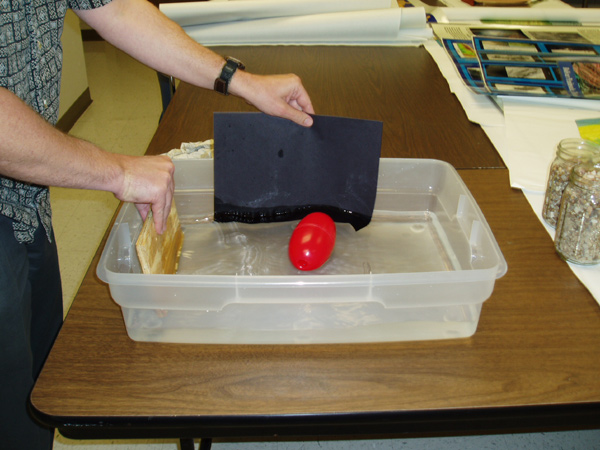
Fill a shallow, clear container 1/3 to 1/2 full of water. Waves can be created by several different methods including moving a thin board back and forth like a paddle. Place a float in the middle of the pan and observe how it responds to the waves you create. Quickly dip a piece of construction paper into the tank to create a snapshot of the wavefield.
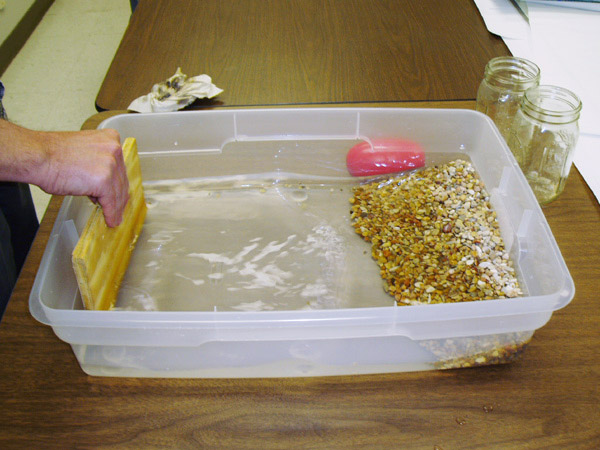
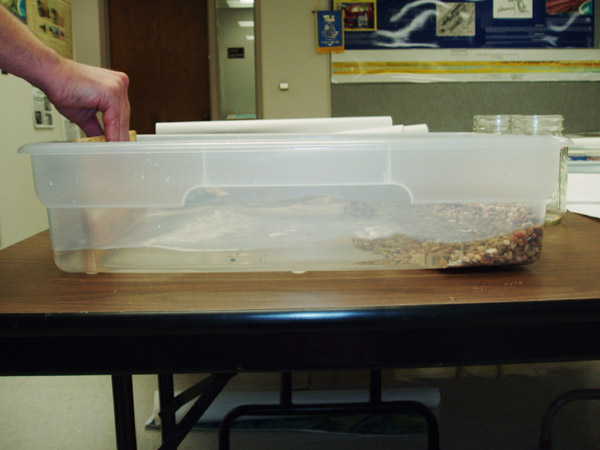
Add sand or gravel to one end of the container to create a beach.
Procedure
1. Fill a Pyrex pan, large cookie sheet, aquarium, or other container with water until the water comes about halfway up the sides of the container.
2. Create waves by one of the following processes: (a) blow across the surface of the water; (b) use a hair dryer set at a low setting (harder to vary the velocity) to blow across the surface of the water; (c) use a block of wood tied to a piece of string, and raise it up and down in the water; or (d) insert a thin board into the water and move it back and forth like a paddle. If you are using a hair dryer: BE CAREFUL NOT TO GET THE HAIR DRYER WET OR RISK ELECTRIC SHOCK!!
3. Place a float (cork) in the middle of the pan. Observe how the float responds to the waves you are creating. Try to keep the wave period consistent.
4. Using a stopwatch, measure the wave period. Make a mark on the side of the pan with the marker or a piece of tape. As the crest of a wave passes the mark, count that as zero and start your stopwatch. The next wave is wave number one. When the 10th wave passes your point, stop the watch. Divide the number of seconds by 10 to get the wave period. Because these are waves with small wavelengths, this task may be difficult to do.
Wave period _______________________
5. Dip a piece of construction paper into the water along the side of the pan and remove immediately. You have created a snapshot of the wavefield. Lay the paper on the desk and with a marker trace the contact between the wet and dry paper. Either now or once the paper has dried, measure wave height and wavelength.
Wave height _______________________
Wavelength _______________________
6. Vary the speed of your "wind." Again, measure wave height, wavelength, and wave period.
Wave height _______________________
Wavelength _______________________
Wave period _______________________
7. Remove the water from the pan. Now mold some clay to represent depth changes in the ocean floor. Try something simple like a wedge to represent the continental margin. Place the clay into one end of the pan. If you have access to sand, dirt, or gravel, you may want to use that instead. Create a beach face at one end of the pan. Repeat steps 3–5.
Wave height _______________________
Wavelength _______________________
Wave period _______________________
Questions
- Were the waves shorter or taller as wind speed increased?
- Were your waves shallow- or deep-water waves before you added the wedge/margin?
- What effect did the wedge/margin have on the waves' height and wavelength?
- What effect do tropical storms and hurricanes have on waves? Imagine that a hurricane is making landfall on the Texas coast. Would the effect of the wind be different on one side of the storm's eye versus the other? You may have to do additional research on hurricanes.
Rock and Soil Facts
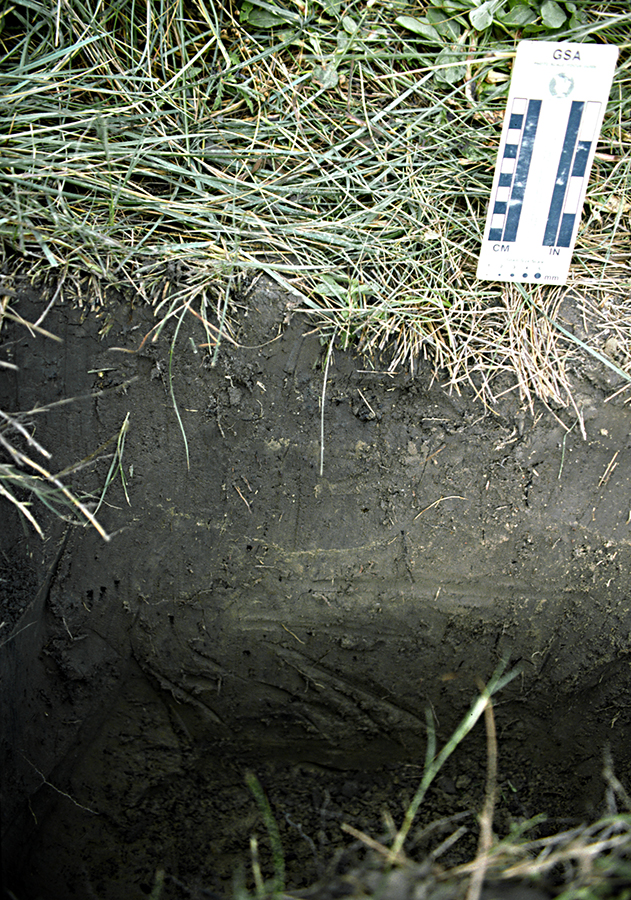
Trench in marsh showing mud and sand sediment.
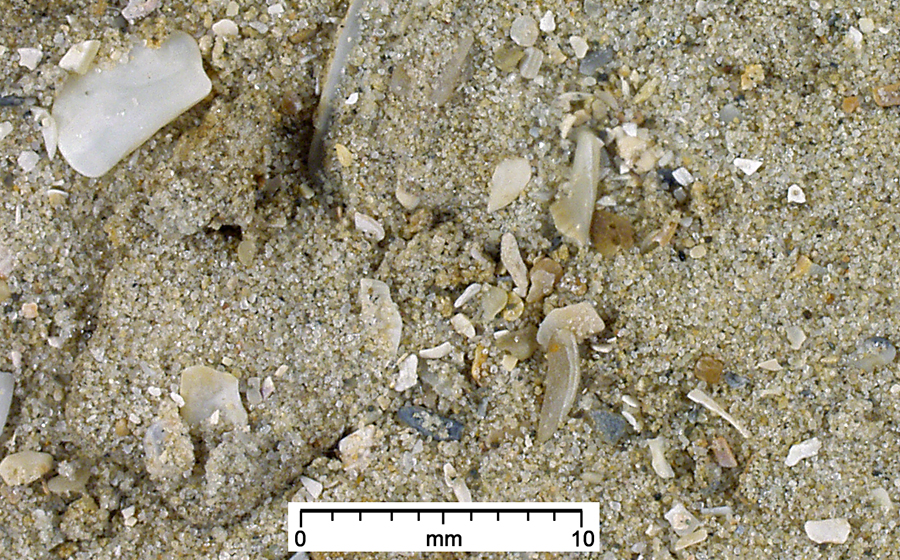
In these dunes wind deposits sand that is finer and better sorted than what is on the beach.
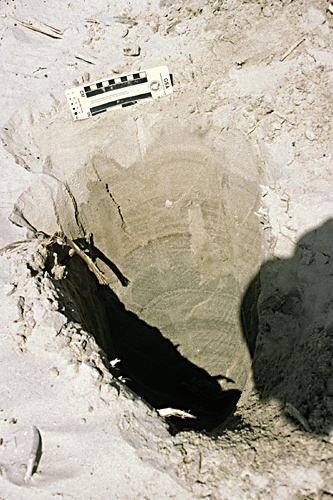
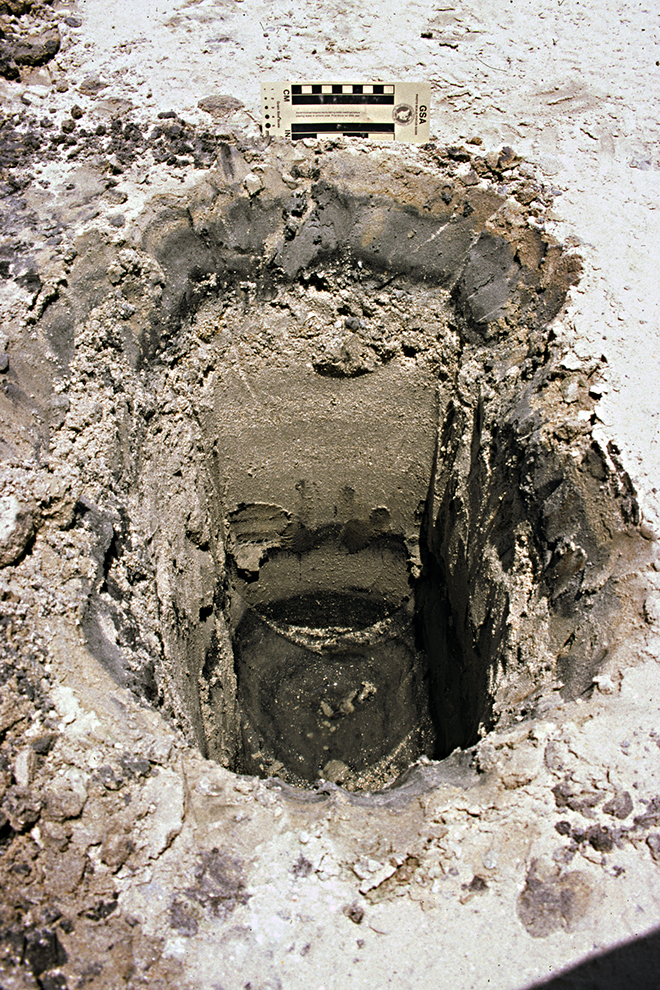
Digging a pit in the beach reveals fine laminations created by waves sorting the sediment on a small scale. In some pits, you may see coarse, shelly or heavy, dark mineral layers deposited by storms. See the two examples above.
Rock Sediment and Soil Facts
If you want to see rock formations, don't go to Galveston Island. However, if you would like to see the first stages of how some sedimentary rocks are formed, then Galveston Island is the place to be. Galveston Island is known as a sandy barrier island because it is made up mostly of sand-sized particles, with lesser amounts of finer mud- and larger gravel-sized sediments. Three main sources of sediment compose the island (1) inorganic mud and sand eroded from the continent and transported by rivers to the coast, (2) organic mud resulting from decaying vegetation and animals, and (3) sand and gravel from shells.
The ongoing processes of wind, waves, and currents sort the sediment making up the island. Little mud is deposited on the high-energy Gulf of Mexico side because it is washed away by waves. To find deposits of mud you need to go to the bay side of the island, especially in the marshy areas. This is where mud is produced by decaying vegetation and where some of the mud moving down the rivers and creeks of the bay is trapped. The marsh vegetation and relatively sheltered locations allow the deposition of mud. In many places on the bay side, however, the marsh may have a shelly beach on the fringe, where bay waves are eroding the marsh and concentrating oyster shells. Also, near San Luis Pass, strong tidal currents transport sand along the bay-side shoreline.
Sand and shelly gravel are found on the Gulf beaches and the island's interior, which is mostly sand because of the way the island advanced seaward after it formed. So as you walk landward from the Gulf beach, you are walking across earlier beach deposits. Most of the sediment on the beach and in the dunes is quartz sand that was eroded from the continent. Whole shells and shell fragments made of calcium carbonate add to the variable texture of the sediment, and small amounts of black, heavy minerals and organic matter add color. Wind and waves sort the sediment according to how easily it is transported. Wind preferentially transports small, light grains, so the sand in the dunes is relatively fine-grained and well-sorted quartz. Compared with dune sand, sand and shelly gravel moved by waves on the beach is coarser grained and more poorly sorted because waves can move all grain sizes.
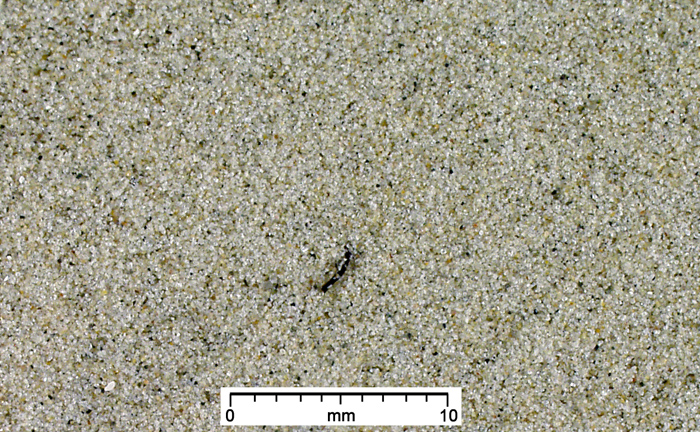
Fine-grained and well-sorted sand from the dunes.
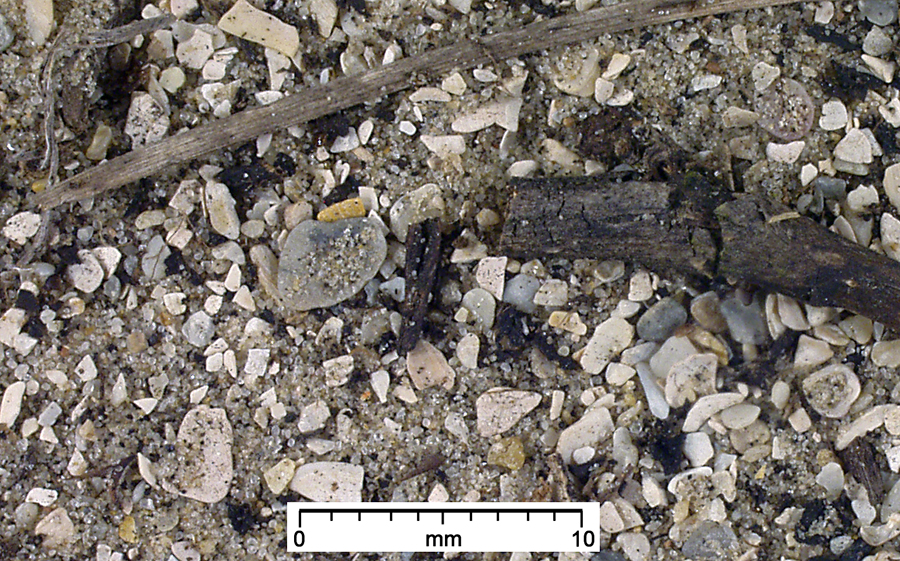
Shelly and relatively coarse grained and poorly sorted sediment from the beach
Coarse and poorly sorted shelly sediment that was deposited by a storm landward of the beach.
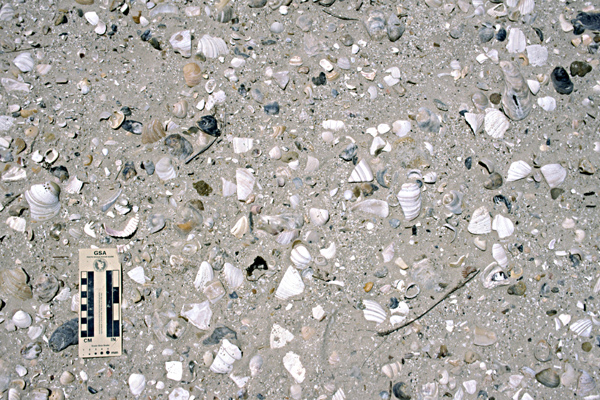
Waves deposited these shells, along with sand, on the beach, then wind eroded the sand leaving a “lag” deposit of shelly gravel
Geodetective
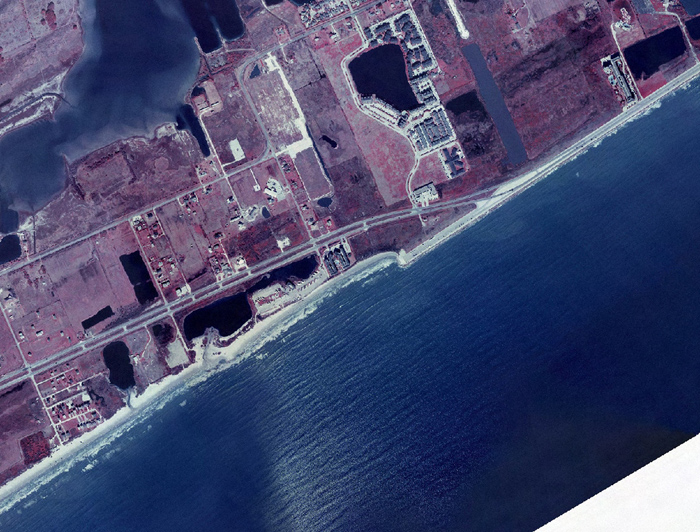
Aerial view of west end seawall.

Aerial view of east end seawall.
Geodetective
Alongshore Sand Transport
When waves strike the beach, sand may move onshore, offshore, or along the beach. If waves hit the beach at an angle, which is almost always the case, then sand will move along the beach. On any given day, the direction on the beach along which the sand moves depends on the direction of the waves. Along Galveston Island, sand can move in either direction, but averaged over the span of a year or more, more sand is moved in one direction than in another.
Can you tell by looking at the photograph and visiting the beach which direction the sand is moving along the beach in the long term? Is this direction the same along the entire island? What do your observations say about the direction of waves?
Hints:
- Very little new sand comes to the beaches from rivers, shell-making animals, or offshore. The major source of sand for a location along a Galveston Island beach is therefore sand that has eroded from the stretch of beach to either side of it.
- Go to the west end of the seawall or look at the aerial photograph and note shoreline shape and position.
- Go to the east end of the seawall or look at the aerial photograph and note shoreline shape and position.
Lesson Plans
Visit the "Where" page: Virtual Tour of Galveston Island, Stop 1, to learn more about this picture.
Lesson Plans
Click the buttons below to download lesson plans in PDF format.