
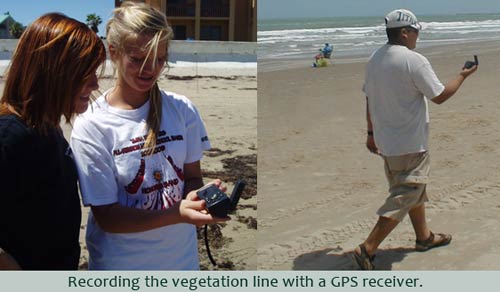
Mapping the Shoreline and Vegetation Line
Beach profiles provide detailed topographic information for analyzing morphology and sediment volume. These profiles, however, cross the shoreline and vegetation line at just one point. GPS surveys provide continuous data alongshore. Measured shorelines and vegetation lines from different times can be plotted on the same map for comparison. This is how the rate of shoreline change is typically determined along a coast.
For the purpose of this study, the shoreline is defined as the wet/dry line. The wet/dry line is the landward-most limit of sand wetted by ocean water (not rain). It roughly corresponds to the position of high tide on the beach and is identified by a tonal contrast. The vegetation line is the seaward extent of vegetation. The vegetation line is measured because it is an important legal and physical boundary. In Texas, houses and buildings must remain landward of the vegetation line. Vegetation is also required for the natural growth and maintenance of protective foredunes.
You will use a real-time differential GPS (DGPS) receiver to conduct the survey. The GPS receiver uses transmissions from satellites to determine latitude and longitude. A GPS receiver operating alone can determine positions accurate to about 100 m. A second transmission (from either a fixed transmitter or a WAAS satellite) can be used to correct the position of the GPS receiver. This is called differential GPS, and it can provide accuracy of a few meters. Your real-time DGPS receiver is receiving data from the satellites to calculate latitude and longitude at the same time it is receiving data from a Wide Area Augmentation Satellite (WAAS). Your receiver uses the data from the WAAS satellite to correct its computed position immediately or, in other words, in real time. To learn more about WAAS and differential corrections please visit the following website: https://www8.garmin.com/aboutGPS/waas.html. This is the website of the manufacturer of your GPS receiver.
- Before beginning the GPS survey, you or other members of your group should mark the profile location with flags. Flags should be placed on the vegetation line and the wet/dry line (shoreline) along the profile. Measuring by using a measuring tape or by pacing, place flags 100 m to each side of the profile along the shoreline. These flags mark the extent of the GPS survey.
- Stand on the southwest, west, or northwest end of the wet/dry line (shoreline). Consult the instructions for your GPS receiver on the following pages and turn it on. Record the latitude and longitude of this location and the time on the data form.
- Walk along the wet/dry line toward the other end of the survey area while the receiver is automatically recording data. If the receiver is set correctly, you should see your path plotted on the screen.
- Because of the small variations in beach topography and the way waves rush up the beach, the wet/dry line will have curves in it. It is not necessary to follow every curve. Instead, walk a relatively straight line that is an average of these curves. Do not stray from your line or you will have extraneous points in your recorded file.
- When you reach the flag on the other end of the survey area, proceed directly up the beach to the vegetation line without changing the receiver. Start walking back along the average vegetation line.
- When you arrive at the end (where you started), proceed directly down the beach to the flag at the wet/dry line. Record the latitude and longitude of this location and the time on the data form.
BEACH ORIENTATION AND SHAPE
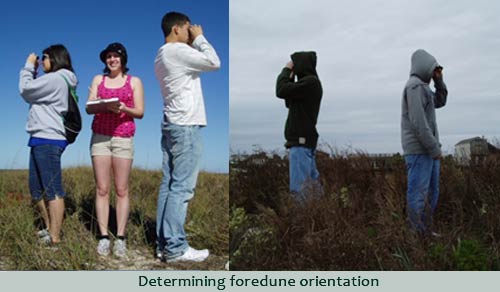
- Shoreline and foredune orientation – These measurements are needed for an exercise illustrating the relationship between wave direction and height, shoreline orientation, and longshore current speed and direction. Disparity between the shoreline and foredune orientation may also indicate an ongoing adjustment of the shoreline. The vegetation line is a more stable feature than the shoreline, and under static conditions it would be roughly parallel to the shoreline. Varying rates of shoreline advance or retreat alongshore, however, may cause the two lines not to be parallel.
a. Stand on the foredune crest along the profile line and sight along the crest to determine the orientation. Turn around and sight along the crest in the opposite direction. Record these values on the form. If there is no foredune, use the vegetation line and make sure you note this on the form. If there is no vegetation line, use the seawall and note this on the form.
b. Stand on the shoreline (wet/dry line) and repeat the measurement that you made standing on the foredune crest. - Beach cusps - Beach cusps are rhythmic topographic features on the beach caused by the interaction of waves, nearshore bathymetry (slope and shape of the ocean bottom out to where the waves begin to shoal), and beach. They appear as a scalloped pattern, but their regularity, spacing, and relief (height difference between high and low areas) vary greatly over time. The high parts of the cusps are called “horns,” and the low areas are called “embayments.” The relief of a set of cusps is the height difference between the horns and embayments. The outline of the cusps usually forms an identifiable berm crest, but sometimes the relief of cusps is so subtle that a berm crest is not well defined. There are often two sets of cusps present: a high set that formed during a period of high water and possibly large waves and a newer lower set that may be actively forming during your observations. You will measure the wavelength (spacing) of the cusps and the relief.
a. Count the number of cusp horns along one of the 100-m distances you set out for the GPS survey. It does not matter which direction you go from the profile. Counting over this distance will give you a more consistent measurement for comparison from one time to the next because the spacing of cusps is not always regular. Make this count for the lower and higher set of cusps if present. If cusps are not present, make note of this on the form by recording the number of cusps to be zero.
b. Use the Emery rods to estimate the relief (height difference between the horns and embayments). Pick a representative cusp for this measurement. There is no need to measure every cusp in the set. You may want to measure a few cusps and average the results.
DATASHEET TIPS FOR GPS SURVEY, BEACH ORIENTATION AND BEACH CUSPS
Profile Name, Date, Start Time: Same as on every page.
GPS equipment: Your equipment will either be a Garmin V or eTrex Legend. The name of the GPS is written on the receiver.
Recorder: Name of individual walking vegetation and shoreline.
GPS Survey:
Start Time: Note time GPS track begins
- Start Point: Write down the Latitude and Longitude of your starting position. This information is found on the position screen of the hand-held receiver. Note you want to record this information as it is presented on the screen, degrees, decimal minutes (Ex. 29° 3.177’ lat. 95° 8.874 long.).
- End Point: Write down the Latitude and Longitude of your end position. This should be similar to your start point.
- End time: Note time at end point.
SHORELINE AND FOREDUNE ORIENTATION
- Foredune trend: Standing on top of the foredune, read an azimuth in the north/east direction and in the south/west direction. Fill in the chart.
- Shoreline trend: Standing on the shoreline mapped with the GPS, read an azimuth in the north/east direction and in the south/west direction. Fill in the chart.
Beach Cusps: Beach cusps are low irregularities on the beach face formed by wave action (Look at the diagram on page 4). In order to see these irregularities you may need to get down low to the surface of the beach. If you can see the beach cusps, count the number in 100 meters and estimate the elevation difference between the high and low part of the cusp. Sometimes there are 2 sets, one is higher on the beach face than the other.


.png)

