
Beach Profile Measurement
WHAT IS A BEACH PROFILE?
A "beach profile" is a topographic transect measured perpendicular to the shoreline. This is the primary measurement the students will make during each field trip. Accurate beach-profile measurements are essential to deciphering shoreline change trends and tracking beach recovery after storms.
Students will measure beach profiles according to the Emery technique. It is simple and low-tech, but extremely accurate if done correctly. An important note of caution is required. If a measurement error is made at one point, then all subsequent points along the profile will be offset by that amount of error. Therefore, take your time and double-check each reading. It is very disappointing to realize after returning from the field that your hard-earned data are erroneous.
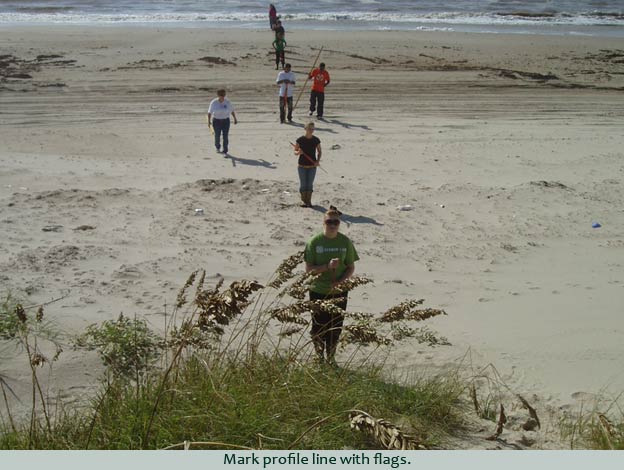
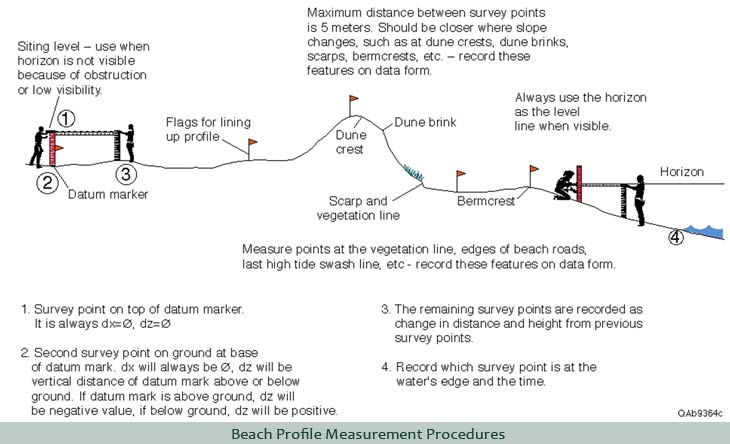
1) Mark profile with stakes or flags Flags will help the surveyors stay along a consistently oriented traverse. At least two people are needed for this task.
a) One person goes to the foredune crest or some other point from which the entire profile is in view. Using a sighting compass, that person should sight back to the datum and move left or right until the correct azimuth is obtained (when you are sighting landward, the azimuth will actually be the reciprocal [180° difference] of the value listed as the azimuth). Place a stake or flag at this location.
b) Standing on this point, have another team member with a stake or flag move about halfway between you and the datum point. Line this person up so that he/she is on the profile (between you and the datum point). Have them place another stake or flag. The landward part of the profile is now marked.
c) Still standing on the same point determined in step (a), turn 180° and, with the compass, sight toward the water in the direction of the proper azimuth for the profile. Have another team member go to the wet/dry line (The wet/dry line is the landward-most limit of sand wetted by ocean water, not rain). Direct the team member to move left or right until he/she is on the profile. Have them place a stake or flag at this point.
d) Now have the team member move toward you along the profile. Line them up on the profile. Have them place a stake or flag at the vegetation line (seaward extent of vegetation).
e) Place other flags along the profile at the berm crest, the last high-tide swash line (often delineated by a line of debris), edges of beach roads, and other features you want to be sure you measure during the profile survey.
Note If you can view the entire profile from the water’s edge, fewer stakes will be required. This will be the case when surveying a profile without a prominent foredune. The idea is to place markers so that at least two of them are visible behind or in front of the surveyors as they conduct the topographic survey.
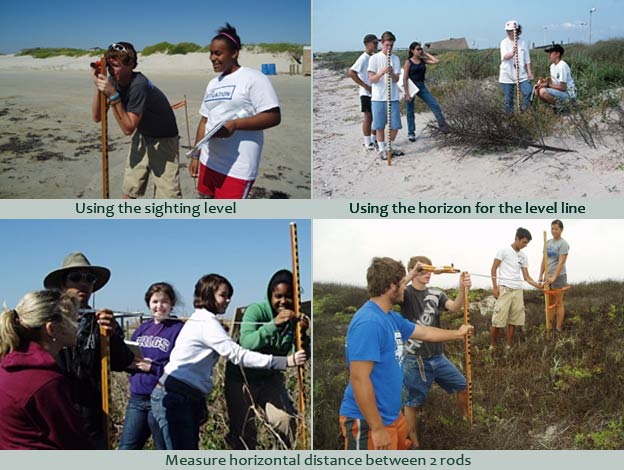
2) Conduct topographic survey (profile) After marking the profile line, you are ready to measure distances and heights along the profile. The following instructions are for five team members. Having five people will increase accuracy and allow for better observations and data recording. See the figures that illustrate this process.
Team members:
Back rod person: Holds the back (landward) rod. In charge of keeping rod vertical and still. Holds end of tape measure.
Back rod assistant: Sights and reads the vertical offset between the rods.
Front rod person: Holds the front (seaward) rod. Holds rod vertical and picks the survey points.
Front rod assistant: Measures horizontal distance between the two rods.
Data recorder: Records the data.
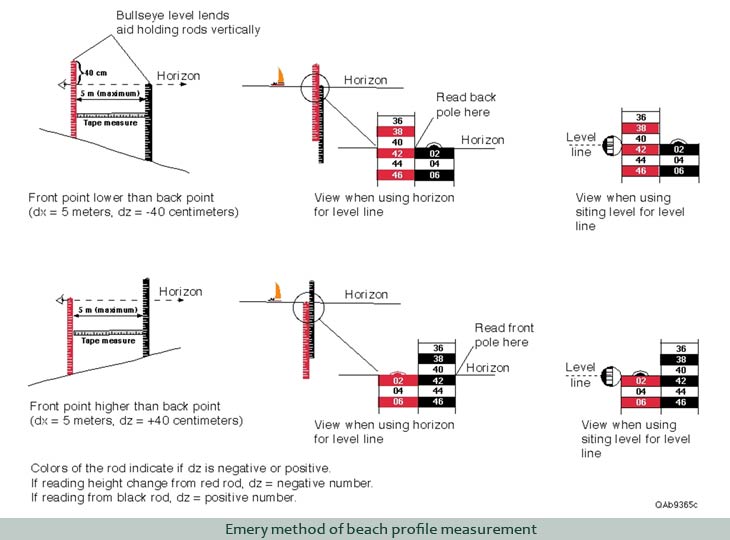
a) Start at the datum point. The top of the datum point is point #1 and is always dx=0; dz=0, the second point is the ground surface above or below the datum point. At this point, dx is always 0, and dz is the distance above or below the top of the datum point. Use your tape measure to measure dz for point #2.
* Note: The Emery rods are marked in 2-cm increments. The numbers are on top of the lines that they label. Read the rods to the nearest centimeter.
b) The back rod (red) is now placed on point #2 (next to datum point), and the front rod (black) moves seaward along the profile to the third survey point. Use the earlier placed markers to line yourself up on the profile line. Refer to diagrams here if you haven't already!
Hold the rods steady and vertical. Use the bulls-eye levels on top of the rods or plumb bob on the side of the rods to aid holding them vertically. It is very important for the rod holders to keep the rods as still as possible when the surveyor sites along the rods to determine vertical change.
If the front rod is lower than the back rod then the back-rod, the surveyor draws an imaginary line between the horizon and the top of the front rod. Where that imaginary line intersects the back rod, the number should be read and recorded as negative in the dz column.
If the front rod is higher than the back rod, then the surveyor draws an imaginary line between the horizon and the top of the back rod. Where that imaginary horizon line intersects the front rod, the number on the front rod should be read and recorded as positive in the dx column.
* Note: If the horizon is not visible because of low visibility or an obstruction, use the sighting level instead.
Now measure the horizontal distance between the two rods using the tape measure. Record this distance in the dx column in centimeters.
Record observations (vegetation, geomorphology, sediment) in the notes column for the front (seaward) rod location. If the front rod is at the still-water line, record this fact in the notes column, along with the time.
c) Front rod stays in place to mark the spot until the back-rod holder moves up to the exact same spot. Only then does the front-rod holder move up to the next survey point. Repeat steps b and c between the profile benchmark and the waterline.
Datasheet Tips for Emory Beach Profile (Page 1 and 2)
Profile Name: BEG02, MUI03, SPI01, etc. Each profile will have a 5 character name. The first 3 characters are letters that represent the location or affiliation (Ex. SPI=South Padre Island, BEG=Bureau of Economic Geology). The last 2 characters are numbers. There are no spaces or dashes between the letters and numbers.
Date: It is very important to remember to write the date year/month/day (Ex. January 24, 2002 = 020124). This is how the date is entered into the database. Again there are no spaces or dashes between the numbers.
Start Time: Please use military time (no colon). *The above three pieces of information need to exactly the same on all 5 sheets. People Involved: Write the name of your classmates participating in this part of the data collection.
Datum Description: Is the datum on a seawall? Is it a brass monument? If so, what is the stamping on it (if any)? What type of condition is the datum in? Were you able to recover the mark?
Profile Azimuth: This will be the same every time you return to this site.
Sketch/Notes: Draw a sketch from the datum along the profile to the water line. It will look like a cross-section of the beach. Make notes along the profile acknowledging the location of the vegetation line, wet/dry line, berm, etc.
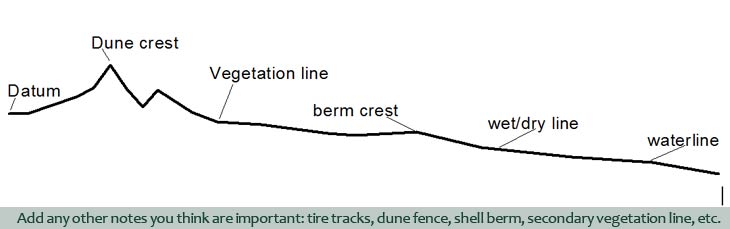
Beach Profile: Start with the second measurement, the top of the datum will always be 0, 0. The second measurement is the height difference between the top of the datum and the ground. This measurement is very important. dx is the distance between the 2 emory rods, dz is the elevation difference. Make notes along the way. The notes will correspond to the location of the front rod and the area in between. Be sure to note important information such as the vegetation line, berm crest, wet/dry line, and waterline. Make notes about the percentage of vegetation between the 2 rods. You want to be very observant about your surroundings along the profile. Again note tire tracks, fences, and anything else you think is important. When you get to the waterline, make sure you note the time.


.png)

